
I'll use GIMP because its what I'm most familiar with, although there are tons of tutorials on the web for Photoshop
Create a new document in GIMP. If you're content area is white, then make the background white. Otherwse, make it transparent. Size is up to you. You don't want to go much wider than 660 or taller than 500 (especially if you have the standard size content area). My current header is 660 x 500 with a wide content area. I think my next header wil be shorter, but thats just me.
The idea is to start with the bottom layer and build up - just like you would do if it was paper in front of you.
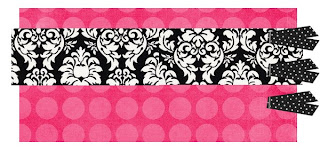
I'm doing a blog design for my friend Brittany, so lets just go with that as an example. Think about your favorite colors and things that make you happy. For instance, I know that Brittany loves pink, black, and lime green. She likes gerber daisies and polka dots. With this in mind, I started with a pink polka dot background.

You can change the size by using the crop tool.* Just make sure you select "Current layer only" before you crop or else your whole header will crop.
Then I decided to tie in the blog background with a strip of the same design. I also added some cute ribbon folds that I downloaded Shabby Princess. You have to be careful what you download from there - they have some really great stuff, but the copyright on some of it won't allow you to use it on blogs, so just be mindful of what you download. You could easily create your own by scanning them into your computer and touching them up in a program like GIMP.
Now we need to add the title - I mean what is the purpose of the header other than looking cute and introducing your blog? So I added a place to put the header (a tag I also got at Shabby Princess). You can fancy it up by using a clip, tack, or some other accent. I found this clip in a download from Amanda's blog. I also added a gerber daisy, just for kicks and giggles.

Then add the title. You can use the text tool to do this - its easy to resize, recolor, change the font, etc. Taa daa!

Now that's cute and all, but I wanted to add a little somethin' somethin', so I added the green swirly things (from Shabby Princess again).

Use your move tool and crop tool to adjust the location and size of layers. You can also move the layers above or below other layers using the Layers, Channels, Paths window (usually on the right side of the screen).
**Other fun tools you can use:
The Color Picker tool - after selecting this tool you can click on a color in a layer and it will hold it in your color history. Then you can use the same color on your font or shapes. For example, I color picked the dark pink on the bottom layer and used it on the title words. This way your colors all match precisely.
The Crop tool - like I said, this can either crop you're entire document or just your layers. Make sure "Current Layer Only" is selected if you want to crop just the active layer.
The Text tool - this allows you to write text on your document. For this header, I created three text boxes - one for "As told by," one for "-B-," and one for "A blog by Brittany." Having separate text boxes allows you to use different fonts and sizes of fonts for different words and lines of words.

Another awesome thing to play with is color. Say that you found a design that you love but it isn't the right color. No problem! Open it in GIMP and go to Colors > Colorize. Play around with it until you get the exact color/shade you want. Then you can use it - no problem. In fact, you wouldn't know it but the green swirly things in Brittany's header were actually gray. And the green clip was actually black and white... (like the one in my header). And the gray tag was off-white. You can use any pattern/embellishment you like if you can colorize it to the right color!
Okay. Once you've got it like you want it - save it as a .xcf (so you can go back and change it if you want), and then save it as a .jpg (so you can upload it onto your blog).
Then go to your blogspot dashboard and click on "Design." Under the "Page Elements" tab you should see a storyboard layout of your blog. At the top is a box for "Header." Click edit. A window will pop up and you should uncheck "Shrink to fit" (you don't want your awesome design to shrink!) and check "Instead of title and description." Then upload the .jpg file from your computer. Save and check out your awesome blog header!
If you have an awkward border around it (I hate that thing), you are not to worry. Go back to "Design," but this time go to "Edit HTML." Scroll down to the header section and find this:
#header-wrapper {
width:1000px;margin:0 auto 10px;
border:1px solid $bordercolor;
}
Change it so it says this:
#header-wrapper {
width:1000px;
margin:0 auto 10px;
border:0px solid $bordercolor;
}
Then go down a bit and find this:
#header {
margin: 5px;
border: 1px solid $bordercolor;
text-align: center;
color:$pagetitlecolor;
}
Change it to this:
#header {
margin: 5px;
border: 0px solid $bordercolor;
text-align: center;
color:$pagetitlecolor;
}
That should take care of the awkward border around your header. You can do the same thing for borders around pictures in your post by looking further down in the HTML code at the IMG in the Post section.
Another option is changing the border color. If you don't want to change the px strength (size?), you can change the color of the border to white. To do this replace "$bordercolor" with "#FFFFFF". Do it for both #header-wrapper and #header.
Let me know if you have questions! I know a lot of that was pretty vague, but if you've already done the background, you'll pick it up fast! Next tutorial will be on post signatures!


No comments:
Post a Comment